
a9a is an application for adjusting audio file gain, fades, and loops in a GUI before writing the edited results. You can compare multiple files by waveform and loudness, then apply adjustments to selected files or to every loaded file at once.
This manual explains the flow from loading files to reviewing, editing, and bouncing the final output.
1. Window layout
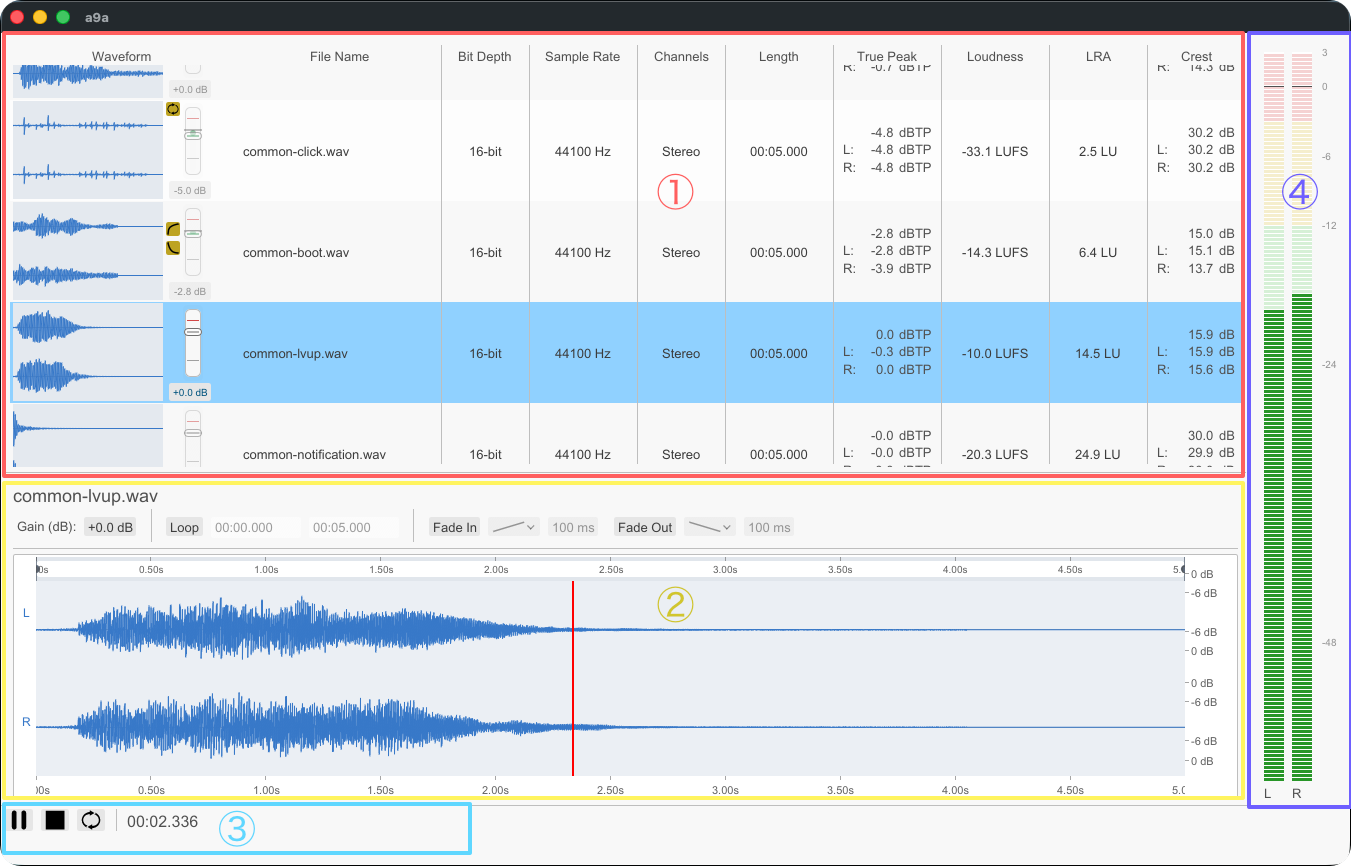
When a9a starts, the loaded file list (①) appears in the center. Select one file to open the detail view (②) below it, where you can zoom into the waveform and make finer edits. The transport controls (③), including play, pause, stop, and loop switching, sit at the bottom. On the right, the level meter (④) shows playback level.
Menu placement differs by OS. On Windows, menus appear at the top of the application window. On macOS, they appear in the global menu bar at the top of the screen.
2. Startup and loading files
2.1 Accepting the terms
On first launch, and after the terms of use have been updated, a terms screen is shown. Review and accept the terms to continue.
2.2 Loading files
You can load files from the menu or by drag and drop.
To open files from the menu, choose Open... from the Files menu, then select the audio files you want to load. You can select multiple files at once.
To load by drag and drop, drag files from Finder or Explorer into the a9a list area and drop them there. Loading starts when the files are dropped.
The supported input formats are wav, flac, aif, aiff, aifc, ogg, oga, and mp3. A progress dialog is shown while files are loading.
Files already in the list, or duplicate files within the same selection, are not added again.
3. List view
The list view lets you compare and operate on loaded files. Each row shows a mini waveform plus the File Name, Bit Depth, Sample Rate, Channels, Length, True Peak, Loudness, LRA, and Crest columns. The Waveform column also shows loop and fade state, along with per-row gain adjustment.
3.1 Selecting files
Click a row to select one file. Ctrl-click, or Cmd-click on macOS, adds or removes individual files from the selection. Shift-click selects a range. You can also move the selection with the up and down arrow keys.
3.2 Sorting
Click a column header to sort by that column. Click the same header again to switch between ascending and descending order.
3.3 Row operations
For a selected row, drag the gain control at the right edge of the waveform column to adjust gain. Files with loop, fade-in, or fade-out settings show icons. Hover over an icon to inspect the current setting. Hover over a row to view the full path to the source file.

3.4 Removing files from the list
Press Delete or Backspace to remove the selected files from the list. This only removes them from the a9a list; it does not delete the original audio files.
4. Playback
Playback is available when exactly one file is selected. Use Play / Pause in the transport to toggle playback, and Stop to stop. Each press of Loop switches the playback loop mode.
There are three loop modes. Selection repeats the loop range configured in the detail view. All repeats the entire file. Off disables looped playback.
The L and R level meters on the right side show the approximate level during playback.
5. Editing in the detail view
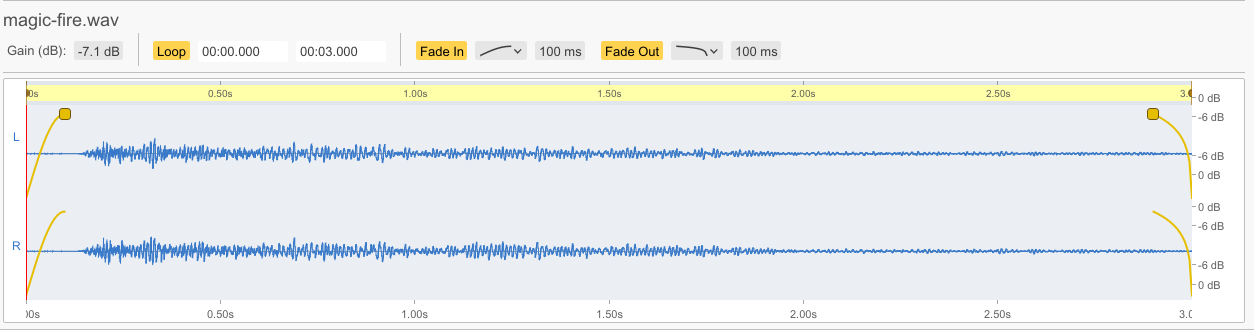
The detail view lets you zoom into the selected file’s waveform and adjust gain, loops, and fades precisely.
5.1 Opening the detail view
Select exactly one file in the list, then choose Show Details from the View menu. On macOS, choose Details.
5.2 Inspecting the waveform
Hover over the waveform to display the time at the cursor position. When the loudness timeline is available, Momentary Loudness and Short-term Loudness are shown as well. Until analysis finishes, the view shows Loudness: Loading....
Click or drag on the waveform to move the playback position.
5.3 Zooming the waveform
Use Ctrl+mouse wheel, or Cmd+mouse wheel on macOS, to zoom horizontally. From the keyboard, use Ctrl++ (Cmd++ on macOS) to zoom in, Ctrl+- (Cmd+-) to zoom out, and Ctrl+0 (Cmd+0) to reset zoom.
5.4 Adjusting gain
Use Gain (dB) in the detail view to directly adjust the gain for the selected file.
5.5 Setting a loop
Use Loop to enable or disable the loop. You can enter the start and end times directly in mm:ss.mmm or hh:mm:ss.mmm format, or edit them in the loop lane.
Drag empty space in the loop lane to create a new loop range. Drag the left or right handle to edit the start or end point. Drag the middle of the range to move the entire range while preserving its length. Click an existing range to enable or disable the loop. Double-click the lane to reset the range to the entire file.
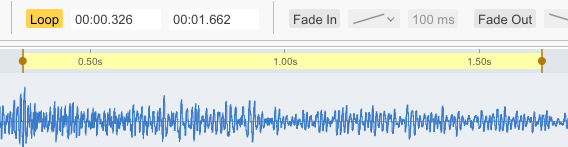
When Snap loop boundaries to nearby zero crossings is enabled in Preferences > General, confirmed loop boundaries automatically snap to nearby zero crossings. The end time shown on screen is the time of the last sample included in the loop.
5.6 Adjusting fades
Fade In and Fade Out each let you enable or disable the fade, choose a curve, and set its duration. You can also drag fade handles on the waveform to change the duration directly. The display updates during the drag, and the change is confirmed when you release the mouse button.
6. Applying adjustments to multiple files
Loudness, peak, and fade adjustments can be applied from the Edit menu to selected files or to every file in the list. In each dialog, configure the values and press Apply.
6.1 Matching loudness
Open Selected... or All... from Edit > Loudness. Set Target Integrated Loudness (LUFS), optionally set Max True Peak (dBTP), then press Apply.
6.2 Matching a target peak
Open Selected... or All... from Edit > Gain, enter Target Peak (dBTP), then press Apply.
6.3 Applying fades in bulk
Open Selected... or All... from Edit > Fade. Enable Fade In and Fade Out as needed, choose curves and durations, then press Apply.
7. Bouncing output
Bouncing writes the edited result to files. Open Selected... or All... from Files > Bounce and configure the output.
7.1 Common settings
Choose the output folder with Output Directory. When bouncing one file, you can set the output filename with Output Filename. Choose the output format with Output Format: Same as Source, WAV, FLAC, AIFF, OGG, or MP3. MP3 is available only when the LAME (libmp3lame) shared library is installed; when it is not installed, the option is disabled and a note explains why.
When Overwrite existing files is enabled, files with the same name are overwritten without confirmation. When it is disabled and a file with the same name already exists, a confirmation screen appears with these choices:
Yes: overwrite this fileYes All: overwrite all later files with the same nameNo: skip this fileNo All: skip all later files with the same nameCancel: cancel the bounce operation
7.2 Format-specific settings
Available settings depend on the selected output format.
| Format | Available settings |
|---|---|
WAV | Sample Rate / Sample Type / Bit Depth / Write Loop Metadata |
FLAC | Sample Rate / Bit Depth / Compression / Write Loop Comments / Start Key / End Key / Length Key |
AIFF | Sample Rate / Container / Bit Depth / Write Loop Metadata |
OGG | Sample Rate / Quality / Write Loop Comments / Start Key / End Key / Length Key |
MP3 | Sample Rate / VBR Quality (0 is the highest quality) |
Because MP3 is a lossy format, loop metadata and comments are not written.
The AIFF Container setting offers AIFF (plain AIFF), AIFF-C (uncompressed) (AIFC big-endian integer PCM), AIFF-C (little-endian) (AIFC little-endian integer PCM), and AIFF-C (32-bit float) (AIFC 32-bit float). Choosing AIFF-C (32-bit float) fixes Bit Depth to 32-bit.
7.3 During bounce
A progress dialog is shown during bounce, and you can check the status for each file. Files overwritten at the same path as their source are automatically reloaded in the list after completion.
8. Preferences
Preferences contains display, playback, and default bounce settings.
8.1 General
Use Theme to choose System, Light, or Dark. Snap loop boundaries to nearby zero crossings controls whether loop boundaries automatically snap to nearby zero crossings.
8.2 Audio
Use Device to choose the playback device. Sample Rate selects the device default or a supported sample rate, and Buffer Size selects the playback buffer size.
8.3 Bounce
Overwrite existing files by default controls whether overwriting is enabled by default during bounce. You can also configure defaults for WAV, FLAC, AIFF, Ogg Vorbis, and MP3.
9. About
About shows the application name, version, engine version, application license, and third-party licenses. The Application License screen can switch between Japanese and English.
10. Menus and shortcuts
10.1 OS differences in the menu structure
| Menu | Windows | macOS |
|---|---|---|
a9a app menu | No | Yes |
Files / File | Yes | Yes |
Edit | Yes | Yes |
View | Yes | Yes |
Transport | Yes | Yes |
Help | Yes | Yes |
On Windows, About is in the Help menu, and Preferences is in the Files menu. On macOS, About and Preferences are grouped under the a9a app menu. The Help menu is currently empty on macOS.
10.2 a9a app menu (macOS only)
| Item | Shortcut | Function |
|---|---|---|
About a9a | None | Open About |
Preferences | Cmd+, | Open Preferences |
Quit a9a | Cmd+Q | Quit the application |
10.3 Files / File
| Item | Windows | macOS | Shortcut | Function |
|---|---|---|---|---|
Open... | Yes | Yes | Ctrl+O / Cmd+O | Load audio files |
Preferences | Yes | No | Ctrl+, | Open Preferences |
Bounce > Selected... | Yes | Yes | Ctrl+Shift+B / Cmd+Shift+B | Bounce selected files |
Bounce > All... | Yes | Yes | Ctrl+Alt+B / Cmd+Option+B | Bounce all files |
10.4 Edit
| Item | Shortcut | Function |
|---|---|---|
Undo | Ctrl+Z / Cmd+Z | Undo the previous operation |
Redo | Ctrl+Y or Ctrl+Shift+Z / Cmd+Shift+Z | Redo the operation that was undone |
Loudness > Selected... | Ctrl+Shift+L / Cmd+Shift+L | Apply loudness adjustment to selected files |
Loudness > All... | Ctrl+Alt+L / Cmd+Option+L | Apply loudness adjustment to all files |
Gain > Selected... | Ctrl+Shift+G / Cmd+Shift+G | Apply peak-based adjustment to selected files |
Gain > All... | Ctrl+Alt+G / Cmd+Option+G | Apply peak-based adjustment to all files |
Fade > Selected... | Ctrl+Shift+F / Cmd+Shift+F | Apply fades to selected files |
Fade > All... | Ctrl+Alt+F / Cmd+Option+F | Apply fades to all files |
10.5 View
| Item | Windows | macOS | Shortcut | Function |
|---|---|---|---|---|
Show Details / Hide Details | Yes | No | Ctrl+I | Toggle the detail view |
Details | No | Yes | Cmd+I | Toggle the detail view |
Zoom In | Yes | Yes | Ctrl++ / Cmd++ | Zoom into the waveform |
Zoom Out | Yes | Yes | Ctrl+- / Cmd+- | Zoom out of the waveform |
Reset Zoom | Yes | Yes | Ctrl+0 / Cmd+0 | Reset waveform zoom |
10.6 Transport
| Item | Shortcut | Function |
|---|---|---|
Play / Pause | Space | Toggle playback and pause |
Stop | None | Stop playback |
Loop > Loop Selection | None | Loop the selected loop range |
Loop > Loop All | None | Loop the entire file |
Loop > Loop Off | None | Disable loop playback |
10.7 Help
On Windows, the Help menu contains About. On macOS, the Help menu is currently empty.
10.8 Shortcuts outside menus
| Operation | Windows | macOS | Description |
|---|---|---|---|
| Switch playback loop mode | Ctrl+L | Cmd+L | Cycles through Selection → All → Off |
| Remove selected files from the list | Delete / Backspace | Delete / Backspace | Removes files from the list only; source files are not deleted |
| Close dialogs | Esc | Esc | Cancels or closes many dialogs |